


A New Bow
I still remember my first bow; a Browning youth bow with a beautiful wood grip and dual cams that never seemed to stay properly timed. I can’t help but smile as I recall watching those first tiny purple aluminum Jazz arrows fly toward a target and the feeling of pride as my skills grew and the arrows grouped ever closer together, first from 10 yards, then 20.
As much as I remember my first bow, I remember my second even more. After a few years spent mowing lawns to earn the money, I finally had it! A real bow, a man’s bow, a HUNTING bow! I knew exactly what I wanted when my dad and I walked into our local outdoors store; I wanted the Martin Jag Mag! It was single cam, camo dipped, smooth, quiet, and accurate, the latest and greatest. I can recall exactly how I felt as I was walking out of the pro-shop with my new bow. I felt joy, pride, and excitement for what lay ahead. Many times I imagined the adventures I would have with this bow in my hand and envisioned the mighty animals I would take with my new and powerful weapon.
Since that day, I’ve gone through many bows; however, the feeling of anticipation and hope that a new bow brings is as fresh and new now as it was those many years ago. A new bow evokes thoughts of new possibilities, adventures, and opportunities. But before we can unleash our instrument of silent death on untold foes, we must first set it up!
Choosing a Bow
The first step in setting up a new bow is acquiring a new bow. Whether acquired from your local pro shop, off the Internet, or from a buddy down the street, proper bow setup starts with buying the right bow. There are two main considerations when purchasing a bow: draw length and draw weight. Draw weight is relatively self-explanatory, so I won’t go into too much detail, except to say that you should choose a draw weight you can comfortably draw, hold, and shoot.
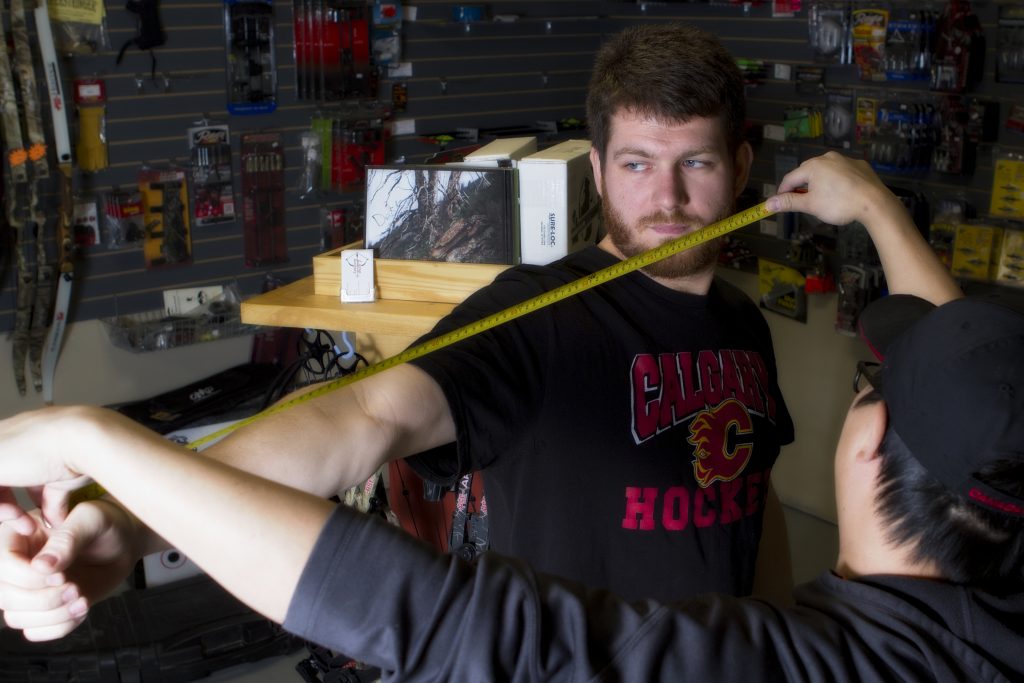
Draw length, on the other hand, is a whole different animal, something that must be seen and felt. Too long, and your anchor point wavers and consistency will suffer because of it. Shoulders tend to roll too high, and elbows bend in toward the string. Too short, and you’ll have an exaggerated bend in your bow arm, a loss of potential speed, and consistent form will be hard to achieve.
I recommend having the draw length measured by a professional while you actually draw the bow with your release. Different bow companies have different ways of measuring draw length and can vary as much as half of an inch in either direction. These small differences between manufacturers may seem insignificant, but on a draw specific cam, that difference can become a real headache. My advice is to try the bow before buying it and make sure that it fits properly. When the right draw length is achieved, the bow arm will be bent just enough to roll the elbow away from the cables, the drawing arm will be high and comfortable, the anchor point should lock in solidly behind the jaw, and ideally the nose will just barely touch the string when looking through the peep.
Before Taking a Shot
Now that you have a bow that fits, it’s time to set it up and make it deadly. First, install a rest. Again, I recommend getting this done at your local shop (especially if you shoot a drop-away style of rest). A pro will put your bow in a vise where a series of levels placed on the string and arrow will help assure “center shot” and get the nock point and rest close to where they’ll need to be once your bow is tuned. The “Berger Button” (threaded hole for the rest) on the bow will also help establish center shot, and some bow companies even put reference marks in their risers to help find the “middle” of the bow.
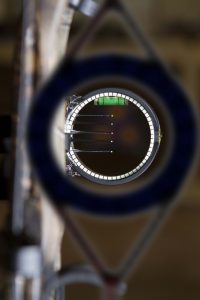
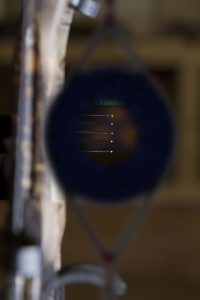
Next step is to rough in a peep sight and get it close to the proper height for your particular shooting form. The aperture of your peep is also important. Selection often comes down to personal preference, but as a general rule, you should be able to see the outside reference ring on your sight. In theory, the smaller the aperture of your peep, the more consistent the anchor point will be, but the darker the sight picture will become. Conversely, a larger hole in the peep will allow more light to get to your eye but may result in less consistent anchoring.

Two more steps, and you’ll be ready for that initial shot. First, unless you are shooting with fingers, you’ll need a release that fits your hand and properly anchors behind the jaw, while matching your style of shooting. Secondly, you need to select arrows. Both of these are hefty topics in themselves, so in the interest of brevity, I’ll save the details for another time.
These days, more archers are starting to take target-style or handheld releases with them in the woods, but the finger trigger or “command-style” release is still by far the most popular style of hunting. There are different opinions on how a release should fit, but most experienced archers will tell you to shoot your release as short as you can comfortably make it. Wrap your entire finger around the trigger, and use the solid groove of your middle knuckle to fire. Avoid using the tip of your finger if you can. The tip of your finger is the “smart” part of your finger and learns to anticipate the shot. Anticipation leads to target panic, and target panic leads to missed opportunities!

Much goes into choosing the right arrow, and debates rage on forums, at bow shop desks, and around campfires. For now, I’ll simply recommend that you try to find a balance, between speed, weight, spine, F.O.C., and kinetic energy, that fits your specific needs. As a general rule, it’s better to err on the side of over-spined. Also, a slower, heavier arrow is typically easier to tune, quieter, and packs more kinetic punch.
First Shots
Now that you have a rest that’s close to the dead center of your rig, a peep that is right in front of your eye when you anchor properly, and you’ve chosen a release and arrows that fit your style, you are ready to install the sight in preparation of the first shot. Eyeball down an arrow, and center your pins with your bowstring. Then take the first shot from close range to establish the height.
Once your top pin is close to being sighted-in, you are almost ready to start tuning your new arrow launcher. However, before tuning the bow, I recommend that you establish your form with the new equipment by putting several hundred arrows through it. Even if you’ve shot for years, this step develops the muscle memory that will lead to consistent form with your new rig and gives you a feel for the draw cycle, the back wall, the let-off, and the shot execution. Once your form is consistent and everything feels natural, from the draw to the follow-through, you are ready to start the tuning process.
Tuning the Bow
 There are many different tuning methods that archers all over the world prescribe to, and all of them involve a tiny bit of witchcraft, in my opinion. The basic reason for tuning is to establish straight and consistent arrow flight and determine if your arrow selection is correct for your particular setup. I feel that there is no one method that is the end-all final word for tuning, and every method has its pros and cons.
Paper tuning (shooting through a tight paper at about 4 yards) is by far the most popular method. It provides a good indication of how arrows are leaving your bow and is helpful in setting the correct nock point. It also indicates any contact issues you may be having and even gives a clue as to whether or not your arrows are properly spined for your bow. Perfect bullet holes through the paper are what you’re looking for; however, it is important to note that there are some archers who may not be able to get absolutely perfect holes through the paper. Longer draw archers especially tend to have more issues getting perfect holes. This may be due to archer’s parallax, arrow undulation in flight, or other factors.
But a tiny hole through paper isn’t the only indicator of good flight and alignment. Other popular tuning methods include walk-back tuning, bare-shaft tuning, broadhead tuning, and French tuning, amongst others. All of these methods have their place in determining dart-like arrow flight, and there are videos online describing how each technique works. Some work with the left/right adjustment of your rest, some with nock point or fletching contact, and some with arrow spine or broadhead choice. All methods may be helpful, but not all methods may be completely necessary. It all depends on how much time you want to dedicate to fine-tuning.
Final Thoughts
 This is where archery really gets interesting because there are so many different things to consider and so many different variables that affect how equipment will perform. No two bows and no two archers are exactly the same, and it is this mystery and mystique that bewitches and allures. Every bow and archer combine to form a new shooting entity, where technology blends with muscles, knowledge blends with skill, and man and machine work in synergy to create magic. Finding the personality of your bow and discovering what works best for you is part of what makes archery so addicting and why it continues to draw so many new fans every year.
At the end of the day, it all comes down to CONFIDENCE.
Confidence that your form is consistent and that your arrow flight is predictable, confidence that you will hit where you are aiming, and confidence that your arrow will perform like it was meant to. You need to know that when the moment of truth arrives and you find yourself at full draw on a live animal, both you and your equipment are capable of delivering a razor-tipped arrow with deadly efficiency and accuracy. At that moment, proper preparation will be your foundation, and confidence will be your most lethal asset. Happy hunting!