


It is interesting to me when DIY hunters scout all summer, shoot endless practice shots, hike countless miles, sleep on rocks and brave the elements to get their trophy, then send the skull to a taxidermist to do something that can be done themselves. European mounts are an excellent way to preserve the memory of the hunt without breaking the bank. Even when using a taxidermist the price is reasonable. However, I don’t think many hunters know this can be done with a relatively small amount of time and effort.
After a successful hunt, the animal is back home, the meat is taken care of, and the truck is cleaned out, a hunter must decide what to do with his trophy. In the eyes of the hunter, a great hunt may necessitate the expense of a taxidermist for shoulder or even full body mounts. Others simply saw off the skullcap and antlers. A sort of “in-between” option is to do a European mount.
Keep in mind that some taxidermists will trade a raw cape for a free European mount of that animal. It is a win-win for both parties and a great option. For me, it depends on the details of the hunt, primarily the kill site. If I shoot an elk near a road, carrying out the cape isn’t a big deal. Do it and then either sell it to a taxidermist or try to trade it for a European mount. If you’re seven miles into the backcountry on foot and you do not want a shoulder mount, you may not want to pack the cape back.
There are basically two methods to do a European mount: insects and boiling. If you have a colony of flesh-eating beetles then use them. The process is simple. The skull is dropped into a colony of insects called Dermestid beetles that are ravenous for meat. They eat everything but the bone and then the skull simply needs some chemical whitening. The upside is the beetles get every tiny piece of flesh and cartilage possible. The downside is you have to pay to have this done unless you have a drop freezer full of beetles you have to feed all year.
If entering scores into the record books is important to you, have the skull done by a taxidermist with beetles, especially with lion or bear skulls where ¼ or even a 1/8 of an inch is very significant.
Alternatively, boiling is a method that requires minimal tools and expense but does require some time and work to complete. Here are the steps to completing a European mount on your own. The attached video will also aid in your understanding of this process.
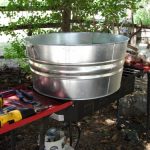
1. Get the Tools: You will need something to boil your skull in. A propane, camp-type stove with a large metal pot is ideal. For an elk or moose skull, you must have something like the set-up used for this article to fit the skull in. For smaller skulls, another option is an electric burner and pot big enough for your skull, although I recommend doing this outside. You are basically making brain stew and it is a stinky process. The main tools you will need are a knife and needle-nosed pliers. Small forceps that one might use fly fishing can be helpful later on. A drill with a ½ inch bit is also useful, but not imperative, as is a long flat head screwdriver. The only chemicals you will need are dishwashing detergent and enough hydrogen peroxide to submerge your skull.
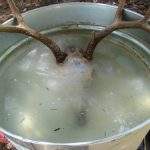
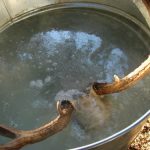
2. Boil and Dunk: Boil water, add some dishwashing detergent, and then put the skull in. Detergent helps cut the grease and helps in the process of breaking down the tissue on the skull. There is no harm in putting the skull in the water while it is being heated up. Once boiling, you can leave it in the water an hour or more before you will notice flesh start to peel off. Try to have as little antler in the water as possible.
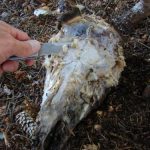
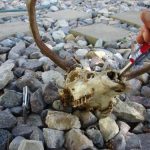
3. Scrape, Cut and Pull: The process is basically boiling, then scraping, boiling, and scraping and so on. You eventually have to get all the flesh and cartilage off the skull. That is the crux of the whole process. Start big and then work to the smaller stuff. Once you have gotten a good amount off, or it’s tougher to scrape it off, put it back in the boiling water, wait 15 minutes or more, then repeat.
4. Brain Cavity: I like to drill two ½ inch touching holes in the bottom of the skull. You may find other places where this works, but make sure you do not comprise the structural integrity of the skull. The screwdriver can also be helpful in removing brain tissue from these holes, or from the brain stem in the back of the skull. Also, a hose helps in washing things out as you cut and tear things loose. The back of the skull and inside of the brain cavity are the most difficult spots to clean. One trick for the back of the skull is to insert needle-nosed pliers into the ear holes and break away all of the bones connected to the ear. This gets rid of some difficult areas.
5. Nasal Cavity: It is up to you whether you want to keep those cool looking, paper thin bones inside the nasal cavity of the skull. In order to do this, it takes loads of extra time and effort to gently remove cartilage and tissue and then run water through to get the gunk out. I’ve done it a few times then realized they still look good without the tedious process. My tip: jam a screwdriver in there and bust everything up then run fast water through it. This speeds up the process and the skull still looks great.
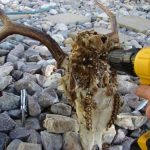
6. Reboil: Once the skull is free of the big stuff, put it in clean water and more detergent. Replacing the detergent will help the remaining grease and small bits of flesh continue to break away. Continue scraping and cutting as you were before. Do your best to remove everything you can. Remember, however, that no matter how hard you try there will still be some tiny pieces of stuff left on the skull in random places, especially on the back. This is ok. You can’t get everything. The whitening process will turn everything virtually invisible and also aid in killing any trace amounts of bacteria.
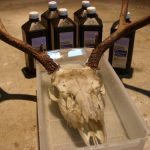
7. Whitening the Skull: There are several ways to whiten a skull. Do not use anything with bleach because it is too powerful and will make the skull chalky. Some hunters paint their skulls white, but I think they look silly. I prefer a regular 3% hydrogen peroxide solution which can be bought at Walmart for cheap. Submerge the skull (and as little of the antlers as possible) for three hours and then rinse the skull off. Let it dry in the sun if possible. Beauty salons carry hydrogen peroxide in a higher potency than 3% and there is nothing wrong with using it if you can get some. I have found that 3% hydrogen peroxide leaves them a natural white and very clean, so I don’t make it more complicated.
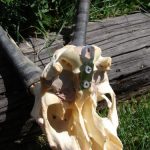
8. Mounting: There are various mounting options available and it really comes down to preference. You can make your own mount by putting some wadded up paper towels through the brain stem hole, then putting some Bondo in and letting it harden. The paper towel is just filler so you don’t have to fill the entire brain cavity with Bondo. Once the Bondo hardens drill any type of mounting hardware you like. Another good option, especially for Pronghorn, is a Skull Hooker or similar product. Since the horns are at a 90-degree angle from the skull, they look weird when put directly on the wall by the back of the skull. It really depends on your preference and where you will display the skull.
You can do European mounts with any skull. The same basic steps apply, but you may vary the size of the knife, drill bit and other tools. At the end of the process, you will have a nice trophy that was truly DIY from beginning to end. A European mount is a great way to preserve the memory of a great hunt and honor the game that was so worthy of pursuit.
Check out the DIY European Mounts Video here.